How to install Dolby Atmos ceiling speakers
When it comes to immersive home theater sound, you can’t beat the unbridled power of Dolby Atmos. Combining the powerful fundamentals of traditional surround sound configurations with dedicated height channels that add an extra layer of three-dimensional immersion, watching your favorite movies in Atmos is a lot like sitting in a luxury movie theater equipped with a thousand-dollar-plus audio system. Those height channels that we mentioned can either be formally introduced to your home’s Atmos surround by installing ceiling speakers or emulated by way of tower and bookshelf speakers with up-firing drivers built into the top of the cabinets, or soundbars with directional capabilities that do a pretty great job at capturing that second-floor layering of Atmos audio.
If you’re all about tried-and-true ceiling speakers, though, the process for installing Atmos ceiling speakers isn’t too different from installing regular ceiling channels — but that doesn’t take away the fact that doing so can be quite the task for even a seasoned do-it-yourselfer. That’s why we’ve put together this helpful guide to teach you everything you need to know about the installation process, from the tools you’ll need to actually measuring, cutting, and placing your Atmos speakers into your ceiling.
Are you sure about ceiling speakers?
Before we begin in earnest, let’s just double-check something. Are you sure ceiling speakers are the right choice for your Dolby Atmos home theater setup?
Installing ceiling speakers can be tricky. If you’re not careful, you could end up with a messed up ceiling, wires hanging all over the place, a partner who now sees you as the person who ruined their favorite room, and … no Atmos. Don’t forget, there are alternatives, like Dolby Atmos soundbars and Dolby Atmos module speakers that are no more difficult to install than your original 5.1 or 7.1 speakers.
Now that we’ve done our due diligence, let’s get at it.
How many speakers do you want?
Some Atmos receivers support up to four “height” (ceiling) speakers, but you can also choose to do just two. If so, you need to decide if they’re going to be placed near the sitting/viewing area, which is optimal, or near the front/screen. Perhaps you want to install four speakers in case you want to add more later, even though your current receiver can only support two.
Decide now.
Speaker placement
Dolby Labs has a series of PDF brochures you can use to figure out the best spot for each ceiling speaker, relative to where you’ll be sitting and to your existing surround speakers. Keep in mind, depending on the location of your ceiling joists, you may have to alter the final placement, but you should know before you start whether or not things like recessed lighting or HVAC/plumbing bulkheads are going to make this a non-starter.
Your wiring path
How are you going to connect these new ceiling speakers back to the receiver? If you’re fortunate enough to be working with an unfinished ceiling, or your room is below your attic, this will be a lot easier to figure out.
If your ceiling is finished, you’ll have to make some educated guesses with the help of a few tricks we’ll discuss below.
Your comfort level
This might be the most important part of the plan. Are you comfortable taking on all aspects of the job? If you’re installing speakers in a finished ceiling with finished walls, you’ll be cutting drywall, running wire through cavities that may have obstructions, and using tools like fish tape.
There’s a good chance you’ll need to drill holes in wooden obstacles like fire blocks. If you end up making an “oops,” you may need to do a small drywall repair, then prime and paint. You don’t need to be a licensed contractor to do this, but if you’re not the patient sort, or don’t think your handiwork will impress, now’s the time to decide where your limits are.
Select your speakers
Before the cutting, wiring (and cursing) begin, you should have all of your materials on-hand.
This includes the speakers themselves. Although your ceiling speakers should be an acoustic match for the rest of your home theater speakers, this isn’t critical. You also don’t need to worry about finding a set with a ton of low-end bass — your subwoofer will take care of that.
What you should look for is a model that features wide sound dispersion. As Dave Napoleone of Toronto-based Cloud 9 AV said, “… the idea is to create a ‘dome’ of sound above you.” Ceiling speakers that are highly directional may not be as effective at this. How much you spend on these speakers will be a function of your budget as well as your existing gear.
If your home theater receiver and/or your amp is a budget model, there’s little to be gained from buying expensive ceiling speakers. If you’ve got high-end equipment, however, you’ll just be cheating yourself by installing cheap speakers.
Choose the right size
Your ceiling speakers will be anywhere from 6 inches to 12 inches in diameter, which likely won’t be a problem given that most ceiling joists are 16 inches apart (on center), with a 14-inch gap between them. The height/depth of the speakers, on the other hand, could present a problem.
In really old homes, builders used massive wooden joists that are 9 inches tall or more. Modern homes will have decidedly less space to play with. Before you settle on a ceiling speaker, make sure your ceiling can accommodate it.
Most will only need 3 to 4 inches of clearance, but there are some that need 8 or 9. If you’ve got an open attic above your drywall, you’ve got no worries. If you’re working in a finished basement, check to see if there are any unfinished areas where you can look up and see the exposed joists.
If all else fails, make a tiny hole in your ceiling, and, using an unfolded wire coat hanger, see how far you can push it into the cavity. Mark the spot on the hanger, and measure once you pull it back out.
Find a spot
Figuring out your final speaker placement will be a combination of following Dolby’s recommendations and working within the constraints of your ceiling. Your joists will be the biggest obstacle, literally, so you’ll have to figure out where they’re located.
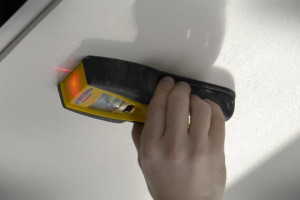
Most of the time, a stud finder will do the trick, but be warned: Unlike walls, ceiling drywall is often not in direct contact with the joists. This creates two challenges. First, a stud sensor won’t always read the changes in material density that tell it a joist is present.
Second, the metal straps that do connect directly to the ceiling in this case are very thin, making them unlikely to register either. Fortunately, there’s a very reliable hack: Step 1: Get a set of rare earth fridge magnets, and glide one across the surface of the ceiling in a growing spiral pattern, starting at the center of where you want to put a speaker.
Go slow, and keep gentle yet constant pressure on the magnet.
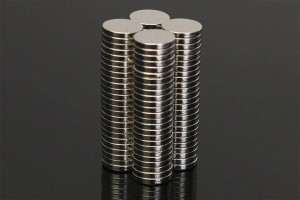 A stack of rare-earth fridge magnets made out of neodymium
Step 2: Eventually, you’ll feel it tug — that’s the head of a drywall screw, and it’s a reliable indicator of the presence of a joist or a metal strap Step 3: Leave it in place and do the same thing with a few more magnets. Usually, joists run across the width of house, so you’ll find the next screw by slowly moving across the ceiling in a straight line toward a wall.
You should now have a line of magnets that show you where one joist is. Step 4: To find the next joist, measure perpendicularly from your magnet line, approximately 16 inches. Start your next magnet sweep here, this time keeping your path parallel to the first line of magnets.
If you’re lucky, the drywaller will have put screws in roughly the same spots. Step 5: Now that you’ve got a good idea where the joists are, confirm your speaker placements. Your speaker hopefully came with a circular template that will let you trace the precise size of the opening you need to cut.
If not, go to the manufacturer’s website and see if there’s one you can download and print, making sure you’re set to a 100% ratio for the size. Step 6: With some double-sided tape, tack the templates to your ceiling. Measuring carefully, double-check distances to make sure the templates are placed symmetrically and in accordance with Dolby’s recommendations (or as close as you can get).
You’ll want to give yourself at least an inch or two of breathing room between the template’s edge and the nearest joist; the speaker needs room for the locking tabs that swing out farther than the circle. If you’re too close to a joist, those tabs won’t be able to engage.
Choosing speaker cable
Rather than a standard speaker wire, a ceiling installation requires a fire-rated in-wall speaker cable, which adds a heavy-duty layer of insulation around both wires. Running any kind of wiring through a wall or ceiling can put the wire in contact with splintered wood, exposed metal strapping, and other hazards that can damage the protective wrapping of standard speaker cable, causing a short — or worse.
The average home speaker cable comes in a 16AWG or 14AWG gauge, which determines the thickness of the two copper wires. The smaller the number, the thicker the wire. “A thicker speaker wire will carry the full frequency and current better,” said Napoleone, “but this is only a factor for long runs or high-power/high-current applications.” Napoleone uses 16-gauge for most of Cloud9’s installs, saying that “for small in-ceiling speakers, I don’t believe you will hear a difference.” If you’re dealing with a really long cable run, or if you’ve got a premium home theater receiver paired to a set of premium speakers, 14-gauge cable could make sense.
How much cable?
Professional AV installers avoid this question altogether by using large spools of speaker cable — much more than they could conceivably need.
If you don’t mind buying your speaker cable in bulk, this is a good way to go. If not, you’ll have to measure carefully, as you don’t want to run short — splicing speaker cable is not recommended, especially if that splice ends up in the ceiling or wall, where it could get damaged. If you’re confident that you’ll be able to pass the speaker cable in a direct line from your speaker and receiver — maybe you’ve got open ceilings and walls — measure that distance by running your tape measure as if it were the actual speaker cable.
If the cable will need to pass around a bulkhead, your tape measure needs to do the same. Take your final measurement and add 10 feet. You may not need this extra length, but if you do, you’ll be super happy it’s there.
If you don’t have the luxury of an open ceiling, assume the worst, and measure the longest possible route, again adding 10 feet.

Make your holes
Once you’re feeling good about where they’re located, take a pencil and trace the template’s circle, then remove the template. Step 1: Using a drywall knife, plunge the blade into the middle of the circle, and make a cut out to the perimeter. Try to stay as close to the circle’s line as possible.
You can always make the circle bigger, but you can’t make it smaller. Step 2: Before removing the entire piece of drywall, you may want to remove one quarter — this should be enough to stick your hand, or your coat hanger, into the cavity to double-check that you haven’t accidentally ended up too close to a joist or other obstacle. If everything’s good, finish your cut.
Step 3: If you run into a metal strap, you’ll have to cut this too, using a small hacksaw. If you hit a joist, you’ll have to reposition your template and begin a new hole. A drywall repair is way easier than trying to cut away part of a joist — not to mention it weakens the joist!
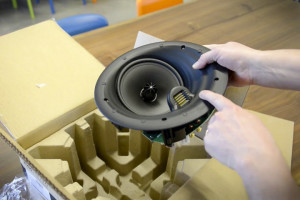
Step 4: Grab one of your speakers (without the grille) and try it out for size by lifting it into the hole. It should slide in with little or no resistance, and you shouldn’t have any visible gaps between the edge of your hole and the leading edge of the speaker. If it won’t go in all the way, gradually enlarge the hole by running the drywall knife along the perimeter, removing small amounts of material as you go.
It’s important to do this evenly. Eventually, your speaker should fit perfectly.
Run those cables
Before you begin fishing cable through, mark each cable according to the speaker it will be connected to (e.g. “Atmos Right” or “Ceiling Right”). If possible, write on the actual cable itself instead of using an adhesive label, which could get ripped off when you run the cable.
Step 1: Because there are almost as many installation techniques as there are home theaters, we can’t offer you step-by-step instructions for your specific room. What we can do is point you to some excellent resources on the web that cover a wide variety of room types and installation techniques. Step 2: Wayne Pflughaupt over at Home Theater Shack has assembled a five-part guide to in-wall wiring that’s as useful for general wiring as it is for speaker cables.
He covers several scenarios, including open-attic ceilings and drilling through fire blocks and top plates, and he has some excellent tips for the first-timer, like how to use a pull-chain and a magnet to make your life way easier. As good as Wayne’s guide is, it doesn’t have any video. Sometimes you just need to see exactly how this stuff is done.
Here are a few helpful videos, including How To Fish Cables Through the Wall, a ceiling speaker install walk-through, a video using an ingenious tool called a Magnepull, and how to deal with tricky insulated walls and walls with fire blocks. We’re also going to discuss two specific tools that we think are essential to running cable in walls and ceilings: Fish tape and a fishing rod.
Fish tape
Fish tape is a flexible but very strong spool of spring steel. It’s perfect for pulling cables through conduits, walls, or any other location that is fully enclosed, with few or no obstacles.
It’s rigid enough that you can guide it simply by pushing it, yet flexible enough to get around gentle bends or very narrow openings. As long as nothing blocks its path, you can push a fish tape very long distances. To use fish tape, you start from your destination.
For instance, if you’re running a cable from the top of a wall to the bottom of a wall, you insert the fish tape at the bottom of the wall and run it up so that the end of the fish tape emerges at the top. Once you’ve got some length exposed, securely attach your cable to the end of the fish tape with electrical tape. Start by wrapping the tape around the fish tape and then around the cable too so that you’ve created a sock of tape around the end of the cable — this will prevent it from snagging on the drywall or any other objects.
Wrap the tape as tightly as possible; you want the cable securely connected to the fish tape, but you also want to minimize the thickness created by the cable. Once secured, gently guide the cable an inch or two back into the hole at the top of the wall, until the taped portion is no longer visible. Now you can return to the bottom of the wall and start pulling the fish tape out.
Make sure there is nothing preventing your cable from freely feeding into the top hole; you may want to ask someone to help with that task. If you encounter anything more than gentle resistance while pulling, stop. Push the fish tape back a few inches and try again.
You may need to do this several times, and combine it with a twisting motion. Be patient, and don’t give up — if the fish tape made the first journey, it should be able to make it back.
Cable fishing rods
Cable fishing rods are actually quite similar to regular fishing rods, in that they’re designed to be straight, rigid poles that have enough flex that you can guide them from an angle. They come in a variety of lengths, and you can usually connect multiple rods to achieve virtually any total length.
Most offer a few screw-on accessories like hooks and eyes. Unlike fish tape, which will naturally curl, a fishing rod stays straight. When running cable through a ceiling, you need to stay above hazards like recessed lighting and drywall strapping.
A fish-tape spool makes this very difficult as gravity will constantly pull the tape down, usually right into the obstacles you want to avoid. A fishing rod can be guided to the very top of your ceiling cavity, and as long as you maintain upward pressure on the rod, it will stay there, easily clearing the objects closer to the drywall. For enclosed ceilings, a fishing rod is a must.
Another benefit to a cable fishing rod is that you can push as well as pull the cable. You’ll need to decide based on your specific circumstances which technique will work best, but here’s a helpful tip: If you decide to push your cable through a cavity and you get stuck, you’ll probably need to pull back on the rod. If there’s any slack on the cable, it could get looped around an obstacle, making it impossible to retrieve.
We suggest spinning the rod as you push, causing the cable to wrap tightly around it, keeping slack to a minimum.
Installing the speakers
Assuming everything worked out with your cable runs, this is the easy part. Step 1: Strip the ends of your two copper wires by 3/4 of an inch. For each wire, twist the copper strands until they form a tight, single bunch.
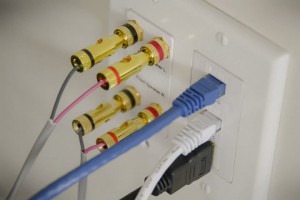
Step 2: Making sure you respect the positive and negative wires, connect them to the appropriate terminals on the speaker. Some speaker wires are red and black, while others can be white and black. Always connect the black wire to the negative terminal so that you don’t get confused on either the speaker or receiver ends.
Step 3: Gently lift the speaker into the hole while taking care to keep your excess speaker wire from sitting on top of the speaker housing — this could cause unwanted vibrations. Step 4: Using a screwdriver, slowly turn the screws for the locking tabs. You’ll hear a click as the tabs swing out from their home position and begin to descend their guide rails.
Keep turning until you encounter resistance, and repeat for all four tabs. Step 5: For your last step, apply some very gentle pressure to each tab screw to make sure the tab is well seated against the drywall. Do not over-tighten these tabs … there’s no need to do so, and if you accidentally snap them, they’ll be useless.
Grab your speaker grille and, depending on the kind, either snap it into place or let the built-in magnets do the work for you. Congrats, you’re all done!
Configuring your system
Don’t forget, now that you’ve installed and connected your new Atmos height speakers, you’ll need to tell your home theater receiver that they’re there. Using the Settings menu, find the appropriate section for speaker configuration and follow the on-screen instructions.
You may need to repeat the automatic leveling procedure if your receiver came equipped with a room mic. If your receiver lets you set crossover frequencies for each channel, you’ll want to make sure the new Atmos speakers are set according to the manufacturer’s suggestions.
Add the Atmos
Of course, the final step is auditioning your new Atmos speakers with a really good Atmos-enabled movie. You’ll need an Ultra-HD Blu-ray player for this and a selection of the best Atmos movies.
If streaming is more up your alley, you can also enjoy Dolby Atmos sound when watching certain Netflix titles.
Editors’ Recommendations