How to build a PC from scratch: A beginner’s guide

Learning how to build a PC from scratch is easier than you might think. The process mostly involves screwing in the right screws and connecting the right cables, so as long as you’re careful with your components and take the proper safety precautions, even beginners can make a PC that rivals the best desktop computers. Although there are a lot of steps to in building your own computer, the process isn’t too difficult.
We’ll walk you through the process step by step so you can learn to build computers in the future and finally put to rest the idea that it’s hard to build a PC. We’re building a gaming desktop here, but the process is the same regardless of what type of PC you want to build. If you’re gunning to build a gaming desktop like us, make sure you have one of the best graphics cards to install in your system.
Getting started
This guide is all about piecing desktop PC parts together to create a functional machine.
If you haven’t selected and purchased all the required hardware, make sure you do that first. Also make sure that it’s all compatible and that it will fit inside whatever case you want to build it in. Here are the core components to build a PC:
- Case
- CPU
- CPU cooler
- RAM
- Hard drive or solid-state drive (SSD)
- Power supply
- Graphics card
Multiple PC components need to be compatible with each other, which can create some headaches for newcomers.
We recommend using a site like PCPartPicker to select your components, as it automatically checks for compatibility issues. Before you dig in, ensure there’s a clean workspace with plenty of room to open boxes and put parts together, preferably a desk at a comfortable height for working on.
 Bill Roberson/Digital Trends
Safety first
There’s an invisible risk when building a computer that you rarely have to worry about with an assembled PC: static electricity. The same force that lets you shock your friends when you wear wool socks can also fry components in a heartbeat.
Fortunately, static is easy to all but eliminate with a few simple steps. One simple solution is to purchase an antistatic wristband. One end wraps around your wrist, and the other clips somewhere on the computer case, keeping the wearer constantly grounded.
Touching the case frequently with the PSU plugged in and powered off achieves the same effect. Make sure you’re building your PC in a room with a bare floor if you can — carpets generate a lot of static — and wear rubber-soled shoes rather than socks. Many components ship in antistatic bags, so leave them bagged until just before installation.
Opening the case
Preparing the case is the easy part.
Instructions for the specific case you purchased should introduce you to its basic layout, as well as list special instructions regarding component installation. Lay down the case in your work area and remove the side panel. For most PC cases, this means the left-side panel when viewed from the front.
This panel provides access to the case interior. Also, remove anything that’s dangling inside the case. If it’s attached, push it aside.
Many cases have permanent internal wiring that becomes problematic later on. Before we start putting everything together, we’ll first install the power supply and then set the case aside for a few minutes.
How to install the power supply
The first component to make its way into the case should be the power supply (PSU). It is typically located at the rear of the case, usually in the bottom or top corner.
Consult your case’s manual if you have trouble finding the proper location. Step 1: Place your power supply in the mounting position. Most cases are designed for the PSU to be installed with the fan facing down, letting it pull cool air from outside the case, but check your manual if you’re unsure.

Step 2: Attach it to your case using appropriate screws or thumb screws.

Step 3: If your power supply is a modular PSU, plug in the power cables that you need for your various components.
If you’re not sure, though, don’t worry, you can plug them in later as and when needed. If your PSU is not modular, you’ll have all the cables already installed.

How to install the processor
Although you don’t have to, it’s a good idea to install the processor before you put the motherboard in the case, as access is far easier. Step 1: Carefully remove the motherboard from its antistatic bag and set it on a hard, flat, nonmetal surface such as a wooden desk or the top of the motherboard box itself.
Also, make sure there are no sources of dust or liquid nearby. Even though installing a CPU is an easier task now than it was in previous years, it’s still precarious. There are numerous pins on the CPU and/or motherboard, and bending any one of them could render that component kaput.
The process isn’t designed to be difficult, and as long as you follow the instructions clearly and keep an eye out to ensure the chip is fully seated before you clamp it in place, you’ll be fine. However, there are some subtle differences in the process depending on who made your CPU.

Step 2: Although the design of Intel and AMD CPUs are a little different, the process for installing them is much the same, no matter which kind of processor and motherboard you have. Intel CPUs have flat metal contacts on the underside, and the pins reside inside the socket, whereas AMD CPUs have pins on the underside of the processor and contacts in the socket.
In either case, do not bend or touch the pins. The square metal bracket holding the CPU in place is the load plate, and it’s raised and lowered using the load lever. When clamped down, the end of the load lever tucks under a hook to keep everything in place.
When you unbox your motherboard, the contact array will be covered with a piece of plastic. This plastic will pop out once you open the bracket, so wait to open it until you’re ready to install your processor. First, open the load plate.
Do this by gently pushing down on the load arm, moving it out sideways from under the hook, and then raising it up all the way. The hook’s lever action opens the plate, which you can easily flip up. At this point, the plastic piece will come loose.
If it doesn’t pop out, gently remove it. Step 3: To install the CPU, you need to line it up correctly. On most Intel CPUs, you’ll have notches on the side that allow you to only place the CPU in one orientation.
On the latest 12th-generation Intel CPUs, you get a little golden triangle in one corner to help you align it properly. The same is true of all modern AMD processors. Pick the processor up by its sides and align it correctly using whatever aids you’re given, and gently place it into the CPU socket.
Double-check alignment, and give the processor a little nudge to make sure that it has slotted in correctly. If in doubt, remove it and try again just to be sure.

Step 4: Once you’re happy that the CPU is correctly installed, press the retaining arm down firmly but gently until the CPU is locked in place. This can take quite a bit of pressure, but it shouldn’t be hard.
If in doubt, check again that the CPU was seated correctly before locking it down.

How to install RAM
System memory, or RAM, doesn’t require any careful goo placement or wires. There are just two important factors, assuming you’ve chosen compatible RAM: direction and slot choice. The direction is easy enough.
Each memory stick has a notch in the contacts lining the bottom edge that lines up with a block in the motherboard’s memory slots. If you hold it just above the slot and the two line up, it’s facing the right direction. If it doesn’t line up, spin it 180 degrees.
Slot choice depends on a few factors, one of which is how you purchased RAM. If you have just a single stick of RAM, you want to install it in the first slot, often called A1. If you have two sticks, you’ll often want to install them in the A2 and B2 slots, but check your motherboard’s manual for confirmation of where they should go.
Step 1: When you know which slot to install your RAM in, push the plastic wings at either end of the slot down and outward (some motherboards only have one), then place the stick in the slot sticking straight up. Push down firmly until the RAM clicks into the slot and the plastic wings click back in, and clamp the ends of the sticks. Be sure that your motherboard is well supported across its entire surface, as it is possible to put too much pressure on the motherboard when installing RAM if you push too hard.
This is unlikely, but as with any steps in this guide, take care, and if in doubt, double-check everything before proceeding.

Step 2: Repeat the same process for each stick you have until all of your RAM is installed. We put together a more detailed guide for how to install RAM if you need additional information.

How to install the motherboard
The motherboard is the most unwieldy component in your system, but since it acts as the foundation for everything else in your case, installing it correctly is of paramount importance. Step 1: Take your motherboard’s rear I/O panel from the box — it looks like a small cutout of all the different motherboard ports — and install it in the back of your case by orientating it properly and pushing it in.
Double-check that it aligns with your motherboard’s outputs before plugging it in if you’re not sure which way it goes. Step 2: To install the motherboard, you have to screw it into the insulating standoffs that prevent your components from shorting. Some cases come with these pre-installed, while others need you to install them yourself.
They’re easy to identify because they look unusual — they’re essentially screws that have another screw hole on top instead of the typical screwdriver notch. They’re usually gold or black. If necessary, screw your motherboard’s standoffs into the correct holes depending on the size and layout of your motherboard.
You can look at your motherboard to figure it out or install them where your manual suggests. Step 3: Place your motherboard into your case, and push and wiggle it into place so that it slots into your I/O panel and has all of its screw holes lined up with the motherboard standoffs underneath. To attach your motherboard to the case, screw it in.
First, seat the screws and give them a couple of precursory turns. Then, proceed in a star pattern, tightening each screw a little at a time. Don’t go wild while tightening, as you might damage the board.
You only need enough torque to hold the board in place without it wiggling. Step 4: Once the motherboard is seated comfortably in the case, there are a few necessary connections. The motherboard’s main power connection is a wide, two-row cable that fits snugly into a similar-looking spot on the board itself.
This 20- to 28-pin connector powers both the motherboard and the CPU. However, some boards have a second four-pin or eight-pin connector for the processor, which resides near your CPU, typically in the top corner. If you have it, you’ll need to plug that in, too.
Connect the case plugs and buttons to the motherboard. A double-wide row of pins — the location of which will be noted in your manual — runs the USB ports, buttons for reset and power, and activity LEDs for power and storage. These small cables run in a bundle from wherever the ports reside in the case.
Proper installation can be difficult, however, due to their size. If you have a magnifying glass or a set of tweezers, now is a great time to use them. Some motherboards include an adapter that bridges these jumpers to the right connections on your motherboard.
Otherwise, installing them is as simple as matching the labels on the pins with the labels on the connections. The USB header connecting to your front-facing motherboard ports will be on its own. This connection is around eight by two pins, and they’re enclosed in a larger plastic housing.
This header has a notch on one side that should clearly indicate which direction it plugs in.

How to install the CPU cooler
Installing a CPU cooler differs depending on the cooler you’re using, so for specific instructions, please refer to the manufacturer’s manual or support site. Here are some simple instructions that apply to almost every cooler. Note: In the below images, we’re installing an all-in-one (AIO) watercooler, but the tips apply to most air coolers as well.
Step 1: Every cooler needs thermal paste. You don’t have to use the best thermal paste, but make sure you use some. It typically looks like a silver paste and comes either pre-applied to the cooler or in a short syringe tube.
If you’re reapplying heat paste, be sure to remove the original heat paste with a lint-free cloth and a little isopropyl alcohol. When your CPU is ready, Apply a pea-sized amount to your CPU in the center.

Step 2: If your CPU cooler requires it, remove your case’s other side panel and attach the custom backplate design. You may need to remove the stock backplate from the motherboard first.
Step 3: Place the CPU cooler on top of the processor, and press down gently. Line up any retaining brackets or bolts with the CPU cooler mounting holes on the motherboard. Install the retaining screws/brackets to secure the cooler in place.
If you have to tighten several screws, be sure to do them a couple of turns at a time in a cross pattern so that you don’t put too much pressure on one portion of the CPU. Make sure that they are tight enough that the CPU cannot wiggle around, but don’t overtighten. Step 4: If your cooler has a separate fan, attach it now, and plug its three-pin or four-pin connector into the CPU cooler port on the motherboard.
It should be located near the CPU cooler. If you’re installing an AIO watercooler, mount the radiator at an appropriate point in the case (at the front or rear air intakes/exhaust are common) and attach the fan’s header to the correct port.

How to install the graphics card
Not every system needs a dedicated graphics card (discrete GPU), but if you’re building a gaming PC, it’s a necessity. Intel processors mostly come with integrated graphics, so if you’re not gaming, you don’t need a separate graphics card.
Look out for processors with an “F” at the end, though — they don’t include integrated graphics. Step 1: Modern graphics cards use a PCI-Express (PCIe) x16 slot. It’s a long, thin connector located on the rear of the motherboard, below the processor.
For the vast majority of motherboards, you’ll want to use the top PCIe x16 slot. To seat the card in that slot, you’ll need to remove one, two, or, in some cases, three rectangular backplates from your case. It’s one of many thin metal brackets lined down the back of the case to keep it sealed up.
Do this by removing the screw(s) that secures the backplate(s) to the chassis. Once removed, the plate should slide (or fall) out freely. Keep the screw, as you’ll need it in a moment.
Step 2: Grab your graphics card and, making sure the ports are aligned to the rear of the case and the PCIExpress connector is facing down, carefully slot it into the motherboard. You should hear a click when the motherboard locks it into place, but that’s not always the case on every motherboard. You don’t need excessive force, so if you encounter a great deal of resistance, take another look at the backplate and PCIe slot to make sure both are clear and the motherboard is properly aligned.
Also take note if there is a pushpin that locks the card in like your memory slots, as some motherboards use it as a safety measure.

Step 3: Use the screws pulled from the metal brackets to fasten the back of the card into the same spot in the case. Again, they don’t need to be extremely tight — just enough to hold the card firmly in place.

Step 4: Most graphics cards need more power than the PCIe slot provides. If your card needs extra juice, you’ll see one or two PCIe power connectors on the card’s side facing away from the motherboard or, in some cases, on the top of the card.
This can be a traditional six- or eight-pin PCIe power connector or a new mini 12-pin. Find the appropriate connector on your power supply, sometimes labeled VGA, and slot it in. The connector’s design prevents improper installation, so if the connection isn’t easy, double-check your alignment to make sure it’s correct.
If you need additional help, we have a detailed guide on how to install a graphics card that provides additional information.


How to install expansion cards
Graphics cards aren’t the only components that use PCIe slots. Other add-in cards include wireless networking, sound, video capture, and even storage. Their installation is no different than adding a discrete GPU.
There are a few different types of PCIe slots. Many expansion cards use the “PCIe 4x” slot, which is much shorter than the full PCIe slot used by video cards. A quick check of your motherboard’s connectivity, and the size of the connector on your card, will make it obvious which slot is appropriate.
If in doubt, refer to the expansion card’s manual. Step 1: Remove the metal bracket at the back of the case that corresponds with the PCIe or other expansion slot playing host to your add-in card. Keep the bracket screw handy so you can use it to secure your new card.
Step 2: Line up the row of contacts on the card with the slot and firmly push down. If the card requires any additional power from SATA or four-pin Molex connectors, find the right cables and plug them into the card. Step 3: Secure the card in place by screwing it into the back of the case.
How to install hard drives and SSDs
There are three different storage drive sizes you’re likely to encounter, and they all mount and connect differently.
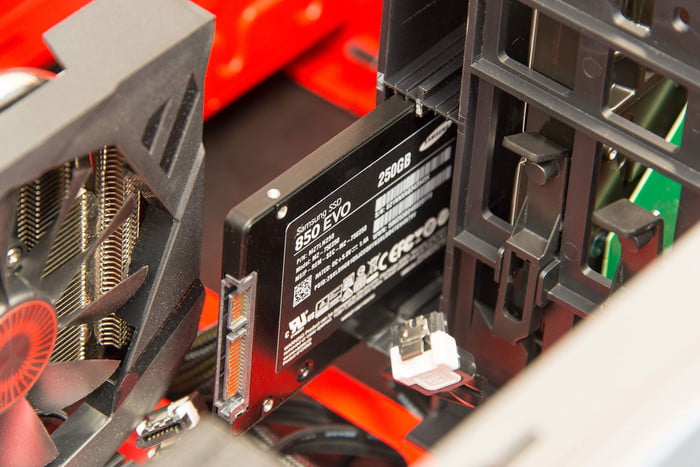
Generally, hard disk drives (HDD) are the larger 3.5-inch size, while newer solid-state drives (SSD) adopt the smaller 2.5-inch size. There’s also the even smaller M.2 format and PCI-Express drive format, which tend to be thin sticks with bare chips measuring around a few inches long. Step 1: To install a hard drive, find the 3.5-inch drive mounting point(s) in your case.
These can be full hard drive cages with multiple mounting points, or it might be just space for a single drive with screw holes right in the case. If in doubt, refer to your manual. Slot your drive into the appropriate place and screw, or lock it into place using your case’s mounting system.
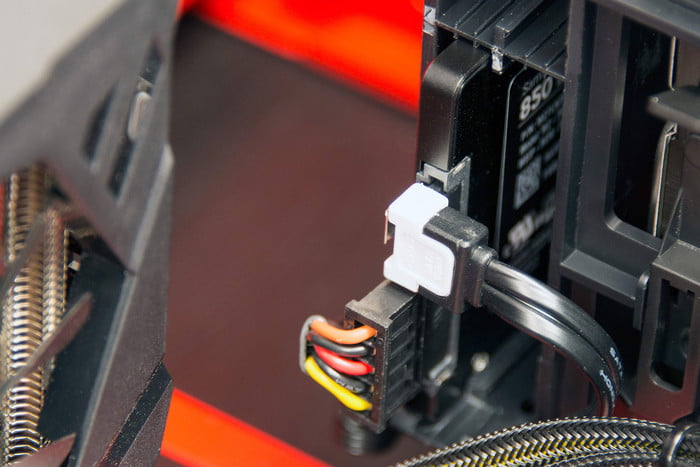
When in place, attach the SATA data cable to the drive and the motherboard, and attach the SATA power connector to the drive. Step 2: To install a SATA SSD, repeat the same steps as the larger hard drive, only changing the mounting point to an appropriate 2.5-inch cage or slot. Make sure that it is secured in place, and attach both the SATA power and data cable.
Step 3: To install an M.2 NVMe SSD, locate the appropriate slot on your motherboard.
It will be labeled, but it is pretty small, so check your manual if you’re unsure. Remove the retaining screw and slot the drive in at a 45-degree angle. Gently but firmly push down on the drive until it clicks into place, then replace the retaining screw.
Step 4: To install a PCIe SSD, choose an appropriate PCIe slot on your motherboard. The 16x slots will offer the most bandwidth, but that may not be necessary for your particular drive’s bandwidth. Consult the drive’s manual for confirmation on which is best for your particular motherboard.
Angle the drive with the gold contacts down, then gently push it into the PCIe slot. It should click into place when it is locked in. It shouldn’t take much force, so if it gets stuck, check the alignment.
Attach any necessary additional power cables.
Double-check everything
With everything installed, it’s worth checking everything once more before you hit that power button. It can prevent any heart-stopping moments where you get warning beeps because you forgot a power cable. Step 1: The motherboard should be seated correctly and doesn’t move if you jostle it a little.
It should also have the 20-plus-four-pin power connector plugged into the relevant slot and be firmly seated. There may be an additional four-pin or eight-pin connector at the top of the board that also needs to be plugged in. Step 2: The CPU cooler needs to be fitted securely to the processor, and the fan needs power.
Make sure the fan’s three-pin or four-pin connector is plugged into the appropriate slot on the motherboard. Step 3: If you have a graphics card, make sure it’s plugged into the board correctly and has any appropriate power cables attached. Some cards, like the RTX 3080, even require two eight-pin connections or their own special mini 12-pin.
These plugs are brightly colored, easy to spot, and only fit in the interior end of the card in one orientation. If they aren’t plugged in, the fans on the card won’t spin, and it won’t produce any video output. Step 4: Make sure any expansion cards are also mounted into their PCIe slot comfortably and have any relevant power cables plugged in.
Step 5: Make sure each hard drive and SSD is installed correctly and won’t come loose when you pick the case up or move it. Ensure they each have the relevant power and data cables plugged in, too.
Turn the PC on
Step 1: Switch on the power supply and press the Power button on the front. If all is well, it should display the post screen or manufacturer logo on the monitor and then move on to Windows installation or the login screen.
If it doesn’t, however, don’t fret. It’s not uncommon for PCs to need to reboot a couple of times on their first startup. If you encounter any error messages or beeps, refer to your motherboard’s manual to decode the message and figure out what you need to fix.
If you don’t get any power at all, turn the power supply off and double-check all of your connections. Make sure the wall socket is turned on, too. Step 2: Once the system does boot up, you’ll need to install Windows.
If you’re not sure how, here’s a quick guide on how to download Windows 10 and install it. Step 3: Once you reach Windows, you’ll need to install drivers. Windows 10 already supports modern chipsets and automatically downloads and installs the remaining drivers in most cases.
Check the Update and security menu in the Settings pane for more information regarding this process. If that doesn’t work, the chipset driver for your motherboard will handle most connectivity and onboard features, though this varies greatly based on motherboard and component manufacturers. You can download the latest version(s) from your motherboard manufacturer’s website.
If you have a discrete graphics card, you’ll periodically have to check for updates and install them when they come available. Check out the AMD page for Radeon drivers or the Nvidia page for GeForce drivers.
 Jacob Roach / Digital Trends
Don’t forget peripherals
It’s easy to get wrapped up in the thrill of building a gaming PC and forget that you need peripherals to make it function. If you still need a keyboard, monitor, and mouse to complete your setup, we can point you in the right direction:
With some luck and a lot of attention to detail, you should have a fully operational system. Keep an eye on your system temperatures for a few days to make sure all the coolers are working correctly, and if an error message pops up, take care of it accordingly. After a few weeks, you’ll get the hang of your machine and be more confident in what you can push it to do.
If something breaks or needs an upgrade, you’re fully equipped to deal with it.
Editors’ Recommendations